You need a good plan to set up cable tray configuration in tricky spaces. Cable tray configuration helps you keep every cable neat and safe. You begin by looking at each cable and where it goes. You pick the cable tray configuration that fits your needs. You make sure cable tray configuration keeps cables safe and easy to reach. You choose strong products that work with your cable tray configuration. You make things safer and ready for the future by using the best cable tray configuration for each cable.
-
Use cable tray configuration made for each cable
-
Keep cable installation safe with strong cable tray configuration
Key Takeaways
-
Look at your cables closely. Find out what type, size, and weight they are. This helps you pick the right cable trays.
-
Make a good plan for your cable tray layout. Leave extra space for more cables later. Do not let cables cross each other. This stops problems with signals.
-
Pick the right tray type for your job. Ladder trays work well for heavy cables. Wire mesh trays are good for light data cables.
-
Use the rules for spacing and keeping cables apart. This keeps cables safe. It also helps stop them from getting too hot.
-
Check your cable tray system often. Maintenance checks can find problems early. This keeps your system safe for a long time.
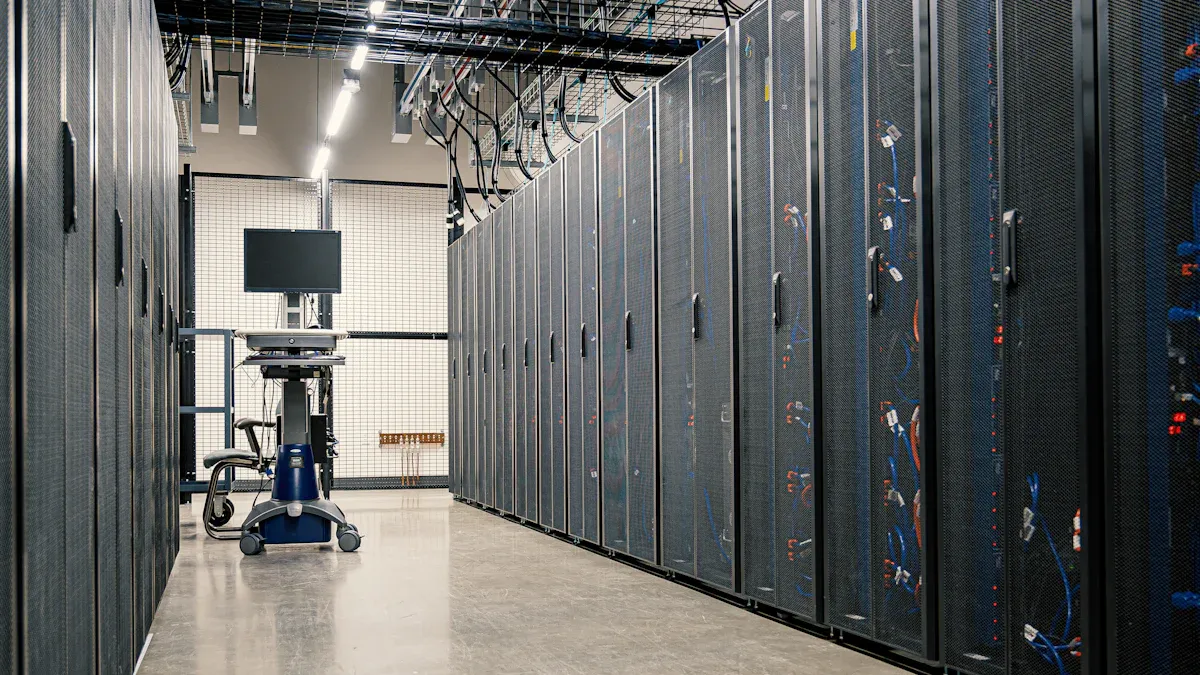
Cable Tray Configuration Essentials
Assessing Cable Types and Loads
Start by learning about the cables you will use. Each cable has a size and weight. Cables can carry power, data, or control signals. You need to know these things to pick the right cable trays.
To make sure your cable trays fit, follow these steps:
-
Write down every cable that goes in the tray. Include the type and size.
-
Look at datasheets or use rules to find each cable’s diameter.
-
Find the area for each cable with this formula: Area = π × (Diameter / 2)².
-
Add all the areas to get the total cable area.
-
Use only 40% of the tray’s space for cables. This keeps things safe and cool.
-
Pick a tray size that is big enough for all your cables.
Tip: Leave extra space in your cable trays. You might need more cables later.
Think about how much all the cables weigh. Heavy cables need stronger trays and supports. If you need fire-resistant or outdoor trays, use stainless steel or other strong materials. Standard cabling helps keep your system neat and safe.
If your project is special, talk to a manufacturer. Ningbo Pudeli Cable Tray Co., Ltd. makes custom trays for different needs. Their team can help you pick the best tray for your cables and loads.
Evaluating Space and Expansion
Space can be tight in complex installations. Plan your cable tray layout to fit all cables and leave room for more later. Good planning helps your applications work well.
-
Pick the shortest and straightest path for your cable trays. This saves cable and lowers power loss.
-
Do not cross cables over each other. Use multi-level layouts or bridges to keep cables apart.
-
Make sure you can reach every cable for maintenance. Do not put trays near walls or obstacles.
-
Leave space between power and control cables. This stops electromagnetic interference and keeps things safe.
-
Use dividers in trays if you have many cables in a small area. This stops signal problems and makes things easier to manage.
Note: Measure your space before you start. Plan for extra cables that might be added later.
Manufacturers can make trays for your exact space and load needs. Custom trays help you use all your space and support your applications. Standard trays work for many jobs, but custom trays give you more choices for tricky projects.
If you know your cable types, loads, and space needs, you can design a cable tray system that works now and in the future. Careful planning keeps cables safe, neat, and ready for changes.
Multi-Level System Planning
Determining Tray Levels
You must choose how many levels your cable tray system needs. First, look at the cables you want to install. Some cables move power. Others move data or control signals. Each cable type is important and needs its own spot.
If you have lots of cables, use more than one level. Put the most important cable on the top tray. For example, power cables go on the highest tray. Put data and control cables on trays below. This order helps you find and fix cables quickly.
Think about how hard your system is. If it is simple, you may need only one or two levels. If it is complex, you may need three or more levels. Each level keeps cables neat and easy to reach.
Tip: Leave space on each tray for extra cable. This helps you upgrade later.
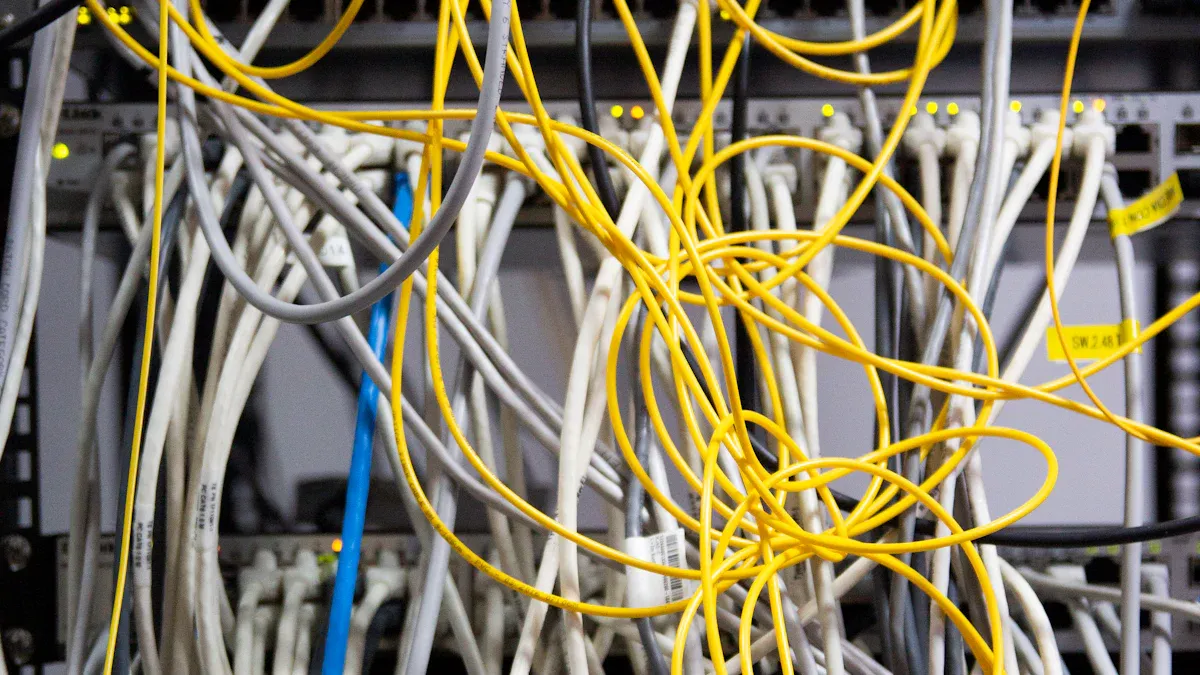
Spacing and Segregation Guidelines
Good spacing and segregation keep your cable system safe and working well. You must follow rules to stop problems like overheating or signal trouble.
-
Leave enough space between each tray level. This makes it easy to add or remove cable.
-
Use side-to-side space to keep trays apart. This stops cables from touching and causing trouble.
-
Keep power cables away from data and control cables. Power cables can cause problems if they are too close.
Follow industry rules for cable spacing and segregation. Article 392 of the NEC says trays with only control or data cable should not fill more than half the tray’s inside area. This stops cable crushing and overheating. The tray must also work as a ground conductor to keep things safe.
The TIA/EIA rules say you should use color codes for each cable. This helps you tell power, data, and control cables apart. You should also keep low voltage data and fiber optic cable away from power cable. This lowers the chance of interference.
Here are some good ways to keep cables apart:
-
Use dividers in trays to separate cable types.
-
Put power cable on one tray level and data or control cable on another.
-
Follow rule 800.133(A)(1)(c) to keep communication cable away from power cable in a tray.
Note: Always check the fill area of each tray. Do not go over the limit. This keeps your cable system safe and easy to use.
A table can help you remember the right way to stack cable:
|
Tray Level |
Cable Type |
Reason for Placement |
|---|---|---|
|
Top |
Power |
Easy access, less interference |
|
Middle |
Control |
Quick maintenance |
|
Bottom |
Data/Fiber |
Least risk of power noise |
If you follow these steps, your multi-level cable tray system will stay neat and safe. You will also make it easier to add or remove cable later.
Tray Selection and Materials
Comparing Tray Types
You have to pick the right cable tray for your job. Each tray type is good for different things. The table below shows how ladder, wire mesh, and solid-bottom trays are different. You can look at the table to see which tray is best for your cables.
|
Feature / Criteria |
Ladder Type |
Wire Mesh Cable Tray |
Solid Bottom Cable Tray |
|---|---|---|---|
|
Design & Structure |
Side rails with rungs |
Open mesh grid |
Flat bottom, side rails |
|
Airflow & Heat Dissipation |
Excellent |
Very High |
Poor |
|
Cable Support |
Strong for heavy cables |
Light, best for small cables |
Strong for sensitive cables |
|
Cable Protection |
Minimal |
Minimal |
Maximum |
|
Load Capacity |
Very High |
Low to Medium |
High |
|
Installation Ease |
Easy |
Very Easy |
Moderate |
|
Maintenance & Accessibility |
High |
Very High |
Low |
|
Durability & Strength |
Very strong |
Less durable |
Strong, heavier |
|
Cost Efficiency |
Cost-effective |
Low cost |
Higher cost |
|
Safety & Compliance |
Meets heavy load & fire |
Good for data cabling |
Excellent protection |
|
Best Suited For |
Power, industrial |
IT, telecom, data centers |
Sensitive, cleanrooms |
Tip: Use ladder trays for heavy power cable. Wire mesh trays are good for data cable. Solid-bottom trays keep sensitive cable safe from dust and damage.
Material Choices for Environments
You need to pick the right size and type of cable tray for your space. The right material keeps your cables safe and makes your system last longer.
-
Galvanized steel trays do not rust easily. You can use them inside where it is dry. They are not expensive and can hold a lot of cable.
-
Stainless steel trays do not rust and are strong in hard places. You can clean them easily. They are best for places with chemicals or water, like food plants or hospitals.
-
Fire-resistant trays keep cable safe during fires. You need them where fire safety is very important.
The place you put your trays can change what you need. Wet air can make trays rust and hurt cable covers. Chemicals can break down cable parts. You should use trays that do not get hurt by water or chemicals in tough places.
You also need to think about hot and cold weather. Heat and cold can make trays move or change shape. Snow and wind can push on trays and cables. You must pick trays that can handle these things.
|
Factor |
Description |
|---|---|
|
Corrosion Resistance |
Pick materials that do not rust and last longer |
|
Thermal Expansion |
Make sure trays can move when it gets hot or cold |
|
Load Considerations |
Ningbo Pudeli Cable Tray Co., Ltd. uses special machines to make trays in many shapes and sizes. You can ask for custom trays to fit your cables and space. Their team can help you pick the right size and type of cable tray for your job.
Layout and Routing Design
Route Optimization
When you put in cable trays, keep the layout simple. Plan your workspace first. Draw a map to show where each cable goes. This helps you avoid mess and makes installation faster. Using good materials helps your system last longer.
Here are steps to make cable tray routes better:
-
Draw your area before you start. Mark each cable’s path.
-
Pick the shortest, straightest route for every cable. This saves time and makes fixing cables easier.
-
Label cables as you install them. Labels help you find cables fast when you need to check or fix them.
-
Do not put too many cables in one tray. Too many cables can get hot and break.
-
Check your trays often. Inspections help you find problems early and keep things safe.
Route optimization lowers risks like cable faults and damage. Planning cable routes well makes your system work better and easier to fix.
Look at your workspace before you install trays. Walk around and check for risks. This helps you pick the safest route for each cable.
Bends, Supports, and Interference
Think about bends and supports when you install cable trays. Fewer bends make installation easier. Every bend can hurt a cable. Rules from IEEE and ICEA say you must follow bending radius limits. For fiber optic cable, the bend radius is 10 to 20 times its diameter. For control cable, it is 6 to 10 times its diameter. Tight bends can make cables wear out faster.
Support spacing matters too. The table below shows how spacing changes with tray type and load:
|
Cable Tray Type |
Support Spacing Interval |
Load Condition Description |
|---|---|---|
|
Ladder Tray |
Varies |
Depends on the number of cables supported |
|
Ventilated Tray |
Varies |
Load dependent, refer to manufacturer's specs |
|
Solid Bottom Tray |
Varies |
Greater intervals for fewer cables |
|
Aluminum Tray |
Varies |
Check installation instructions for specifics |
|
Metal Tray |
Varies |
Installation instructions dictate support spacing |
Always follow the manufacturer's instructions for support spacing. Good support keeps trays strong and safe.
To stop interference, keep power cables away from data and control cables. Use dividers or put cables on different tray levels. This helps prevent signal problems and makes maintenance easier.
Remember these tips when installing cable trays:
-
Use the shortest route for each cable.
-
Do not use sharp bends or too many junctions.
-
Follow bending radius rules for each cable.
-
Space supports right for your tray and load.
-
Separate cables to stop interference.
If you do these things, installing cable trays will be safer, faster, and easier to take care of.
Installation and Compliance Best Practices
Mounting and Grounding
You nee
www.cabletraymic.com
Ningbo Pudeli Cable Tray Co., Ltd.